
You are currently browsing the tag archive for the ‘knitting’ tag.
I’ve made another Hitchhiker, and I seriously, seriously doubt it will be my last. These things are addictive, I swear. This one was for a WWFY swap that was NOT with AnnaMarie. I blame the yarn fumes. (Yes, I only saw yarn pictures and therefore couldn’t have been affected by the fumes; shut up, that’s my story and I’m sticking to it.)
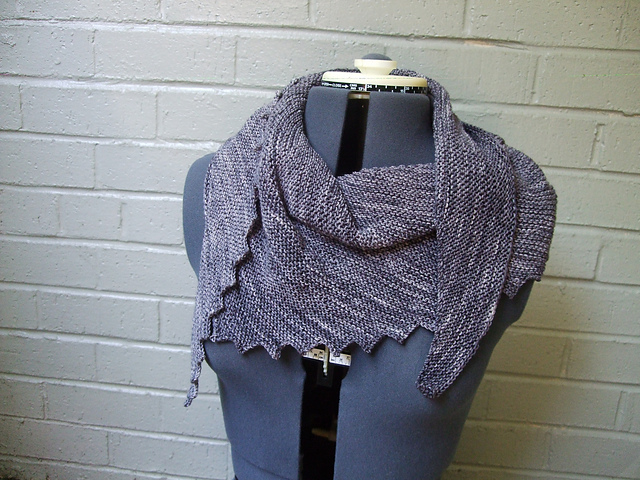
Pattern: Hitchhiker by Martina Behm
Yarn: Wollmeise Twin in Maus Jung
Needles: US 3/3.25 mm Addis
Mods: None (although I got fewer points than the pattern called for)
You read the yarn line right, folks, I got to use Wollmeise for this shawl. And I got another skein of Wollmeise in return, in a totally gorgeous teal. I’m a sucker for teal. Anyway, it was an interesting experience. I already had the pattern memorized from the last Hitchhiker I made, so I was free to totally concentrate on the yarn while I was knitting. I don’t know if it’s true for all the Wollmeise yarns or just this base, but the super tight twist made it feel kind of… crunchy? Like, it’s a very crisp yarn. Not sure I’m describing it all that well, but I did like it. It’s a very cottony feeling wool, which I know some people don’t like, but I do. It would make amazing socks–very hard wearing. And out of 150g, you could get two pairs, or at least I could.
The shawl has long since been returned to its rightful owner, but as I said, I doubt this will be the last Hitchhiker I make. It will certainly not be the last Martina Behm pattern I use. I think I’d like to make Leftie at some point (who knows when). I would definitely recommend Martina Behm’s patterns, by the way. Simple, well-written, and clear. But you don’t have to take my work for it.
Another two-fer! Posting two FOs at a time lets me catch up to my current knitting a lot more quickly. The two for today are two shawls. Different patterns, same yarn. A study in stash busting.
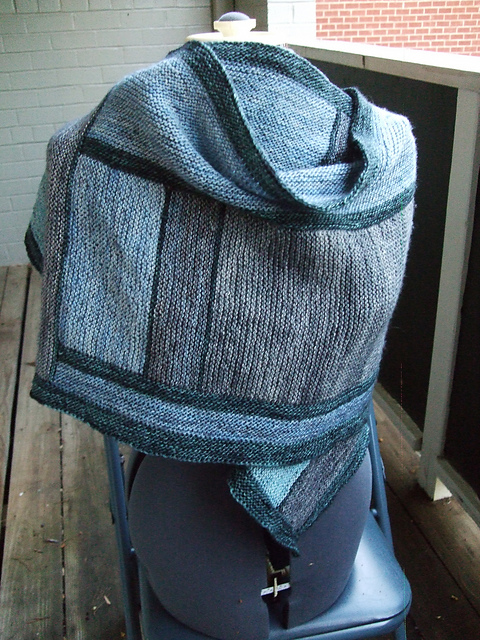
Pattern: All the Shades of Truth by Laura Aylor
Yarn: Madeline Tosh Merino Light in Rain Water, Morning Dove, Charcoal, Fog, and Bloomsbury
Needles: US 5/3.75mm
Mods: I left out a section on one of the ends because I put one on the wrong side and there would be too much of one color next to each other if I left it in. Less a mod than a mistake, but we’ll call it a design feature.
This shawl is knit entirely in garter stitch, which made for almost concentration-free knitting. I did have to stop and count rows every so often and binding off those long sections was a bear, but all in all, I was free to occupy my mind with other tasks while I made this shawl. I actually blocked this one, soaked it in water and everything. It actually made a huge difference–everything opened up and the shawl got a lot more drapey. It’s not surprise to me that blocking can totally change a finished object, but still. Wow.
I mostly enjoyed making this shawl and I do like the color blocking, but I probably wouldn’t make it again. Nothing against the shawl, there are just too many other things to knit.

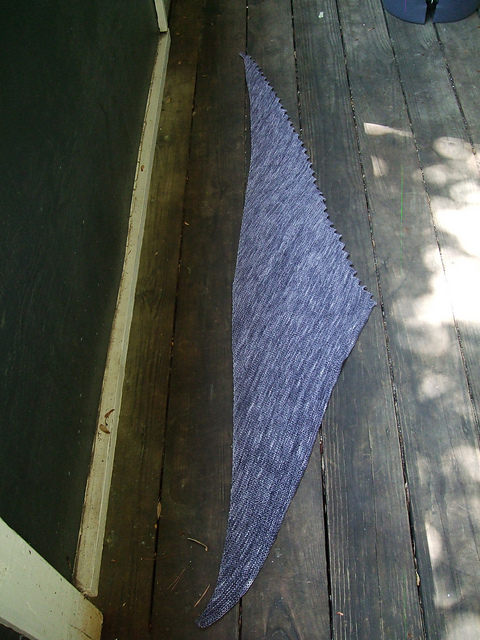
Pattern: Hitchhiker by Martina Behm
Yarn: Same as above, MadTosh light
Needles: US 5/3.75mm
Mods: none
This shawl is also knit in garter stitch and uses the exact same yarn in the exact same colors. After finishing ATSOT, I found I had about 150g leftover, about 75 in one color (Rainwater, I believe) and 75 in varying amounts of all the other colors. Aha! thought I. STRIPES. As it happens, I got this pattern to make this shawl for someone else on WWFY and, in my impatience to start it plus my desire to use up the scraps as fast as possible so they wouldn’t languish in the stash, I cast on one for myself before I got the yarn for the other one.
I properly blocked this one as well, long soak and all. In addition to opening up the fabric and adding drape, this shawl also grew a whole lot. Before blocking, the long side of the shawl was about the length of my wingspan. After blocking, it was at least a foot longer. Blocking, kids. It’s magical.
Following up on my established nerd knitting trend, I have, once again, shown my love for a thing by knitting it. This time it’s the NBC show Hannibal, which crawled into my brain and basically took over. I started watching the show because it was on Amazon Prime and Cleolinda had been doing recaps of it (and I should really learn by now to just watch everything Cleo watches), and very quickly fell in love with it. It’s a very odd show… like, it’s probably not a good idea to shotgun it, given the general violence, cannibalism, and horribleness that is the backbone of the show and I find I need to be in the right mindset to watch it, but still. Love.
Anyway, there’s a stag that shows up a lot and Cleo designated it Dire Ravenstag (and now there’s a Twitter account cause this show is ALL OVER Twitter, let me tell you), and it looks like this:

I knitted one.
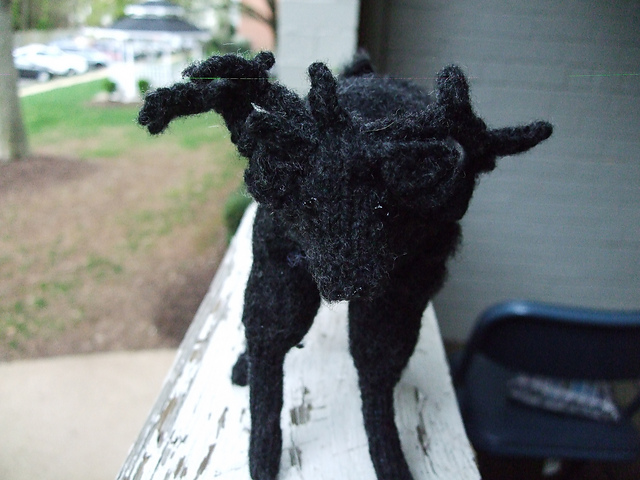
Let me tell you, I scoured the internet for an appropriate stag pattern for this. SCOURED. A pattern for a sufficiently bulky and powerful stag does not exist. Eventually, I gave up and decided to make it up as I went along, and I think that worked out pretty well. The head, neck, and body are all done in one piece using short rows. The antlers, ears, and legs were made separately and sewed on. Despite the thin legs and heavier head, Dire KnittingStag does actually stand up on his own, provided his legs are spread out a little bit. The yarn is a recycled wool. I used a hand card to brush the torso for a fuzzy look, and the eyes and nose are puff paint, just like I do for sharks.

I am super incredibly thrilled with how he came out. I kind of want to write up the pattern (it would, at least fill a stag-shaped hole in the Ravelry patterns database), but we all know how often I say that and how often I actually follow through. Maybe I’ll make one in a more live-deer appropriate color. Or maybe I’ll just knit another Dire Ravenstag. Most likely, though, is that I won’t and will instead move on to a hundred other things to knit.
Another twofer! Two projects for one post! I made some socks.
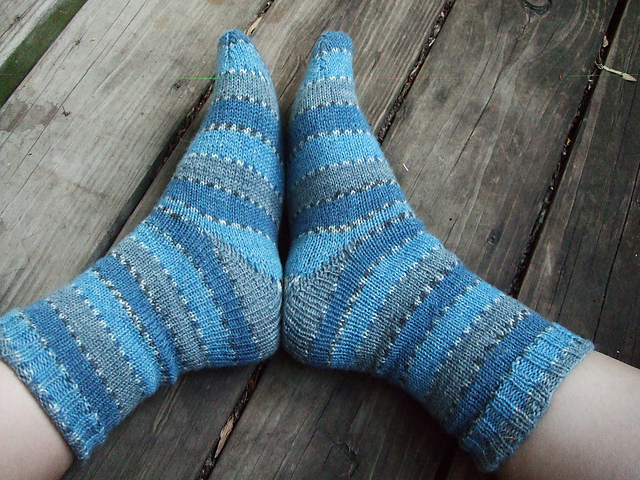
This pair is made with Regia 4 Ply sock yarn. It’s pretty fabulously stripy, which made the knitting super fast (I’ll just knit to the next color… no, the next color). And since I knit the socks one at a time, it also made it easy to make them the same length. It also meant I knit the cuffs a little longer than usual, but I actually really like them this length, so it’s okay.

This pair is made with Premiere Serenity Sock Prints in the “Thyme” colorway, and let me tell you, that is a powerful ugly colorway. Like, maybe without the orange it would be okay, but they put in the orange and just… ugh. I don’t really care though cause they’re socks and they’ll go in shoes and it’ll be fine. The yarn is one I have used for socks before, though I’m not crazy about it. It’s 25% bamboo, and that makes for a really drapey yarn, not really something you want in socks. They tend to sag and stretch throughout the day and by the end, you’ve got more of a sack on your foot than a finished sock. Oh well. I actually got lots of this yarn leftover (as well as in several other colorways), so I’ll probably knit a couple pair of scrap socks with it eventually. They’ll have the same problem, but the bamboo does make them slightly cooler to wear in the summer, so oh well.
I made both socks using the Fish Lips Kiss Heel pattern. It’s basically a short row heel, but it’s really easy and fits really well. And the short row technique is brilliant, so I’ll be doing that for all future short rows. I’ve had problems with short row heels before, but I think the bulk of the problems came in placement of the heel rather than depth or fit. When I first started knitting socks I had a real impatience problem that meant I put in the heel way too early, making the foot super small. I knit all my socks top down now though, so that has helped (as has a large does of patience). If you haven’t given the FLK heel a try, I strongly recommend it. I will definitely be putting it in more socks in the future.
As has been very firmly established, when I like something (movie, book, tv show, etc), I tend to make things. Following in that proud tradition, may I humbly present my greatest nerd crafting achievement to date, a Star Trek dress:

This opus, knit in fingering weight (recycled) yarn on size two needles with no pattern (but contiguous sleeves) took over eight months from conception to completion. I put it down and didn’t touch it for a couple of those months, but still. It took a long-ass time to knit. It’s a ton of stockinette. I can’t even think of how many yards of yarn are in it, lest I faint dead away.
It is probably my proudest knitting accomplishment to date. I love it.
I’ll try to keep my blathering to a minimum, but Star Trek is My People. I adore Star Trek. There are episodes of The Next Generation that aren’t just good, but are probably some of the best television you will ever see. (There are also some episodes of Next Generation that are probably the worst television you’ll ever see, but we don’t talk about those). I am so utterly confused by people who didn’t like Deep Space Nine. Star Trek has fascinating worlds, captivating plots, and representation in SPADES. Not to get all social justice on y’all (I save that for Twitter and Tumblr, mostly), but there are just SO MANY LADIES in Star Trek. I love it.
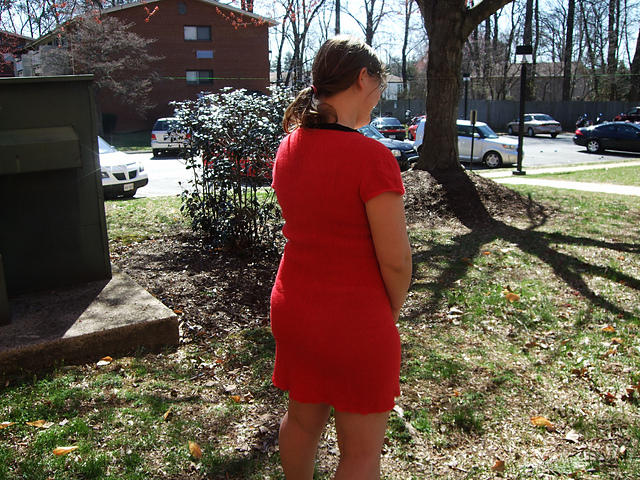
Now, my dress isn’t really an exact replica. It’s mostly based on the Original Series uniform. I’m sort of still in the middle of the Star Trek franchise (I’m in season five of Voyager with Enterprise next up and I haven’t seen most of TOS (but I have seen most of the movies)) (and the first person that tries to nerd shame/fake geek girl me is going to get a lecture and the ban hammer in that order). But there was a lot of knitting to be done and I didn’t want to make most of it black. And the coloring for the Next Generation uniforms would have required intarsia in the round, which, no.
It was, for the most part, a pretty easy knit though. I mean, it’s mostly just around and around and around with some increases thrown in at the skirt. I’m almost crazy enough to knit another one for my Nerd Wars dissertation. I’ve been wanting to do a dissertation for the next round, and it would almost have to be a lace weight dress because there are few things that would actually take three months to knit. I’ll have to look through the yarn stash and see what I have in enough quantity–the sweater that the yarn for this dress came from was enormous with a gigantic cowl neck. I guess I could always do stripes.

I made this dress for being-a-gigantic-nerd purposes, but also to wear to a comics convention that was in DC in April, Awesome Con. As usual, I took no pictures (well, that’s not true. I took a couple of pictures of awesome cosplay), but I had an absolute blast. It was very different from the anime conventions I’ve been to in the past (for more than just the different subject matter), but I’m definitely going again next year. Plus I got to meet Timothy Zahn, author of the Thrawn Trilogy among other things, and that was just SO COOL. I also got to meet Janine Spendlove and Matt Slay of Time Traveled Tales and Silence in the Library Publishing, both of whom signed my copy of Time Traveled Tales, and JK Woodward, an artist for IDW who draws the Star Trek/Doctor Who crossover comics. He drew me an amazing commission of Data and Spot.
One of these days I’ll go to a convention and actually take pictures that I will post on the blog, but today, as they say, is not that day.
A two-fer this time! Two knits for the price of one post! I knit the set as part of a WWFY swap.
Pattern: Kitty Hawk, which is sadly no longer available to purchase (used to be through Sanguine Gryphon)
Yarn: Corgi Hill Farm hand dyes (I think on Polwarth)
Needles: US 2 and 4
Mods: Shortened the mitts by a LOT. Hat was as written.

You may recall I have knit this pattern before. It was easier this time around, mostly because I magic looped the mitts instead of fumbling around with dpns. And because I cut a ton of rows out of the mitts (otherwise they’d have gone all the way to the elbow).
The hat was just as speedy as before. I still really like the shape of it. Maybe one of these days I’ll make one. At the very least, I might make the hat band and wear it as a headband. Or I could pick up from the hat band and make a proper round hat. If I do make the hat as written, I might figure out how I can knit it in the round. Maybe with a purl stitch for faux seams… I don’t mind making the panels separately, but they are a bit of a PITA to sew up. Or something. It’s rare I knit something without editing the pattern in some way. It’s just how I roll.
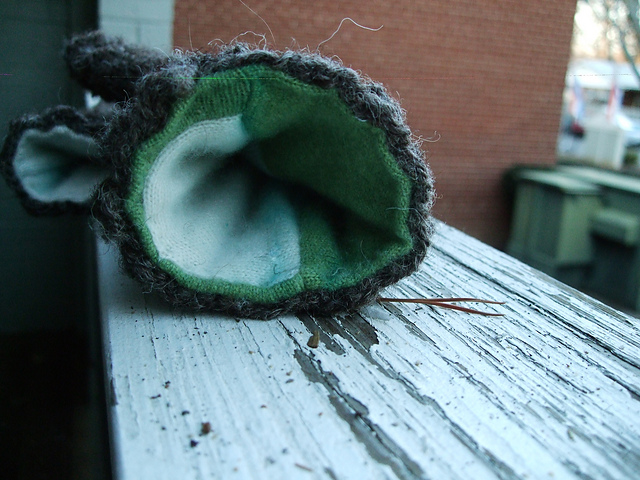
I started these mittens on March 6. I know I keep telling you the dates of things, but this one is actually relevant. I started these mittens in March, okay? They took about three days, so they were finished in March. Keep that in mind. Also keep in mind the fact that I live in usually-fairly-temperate Northern Virginia.
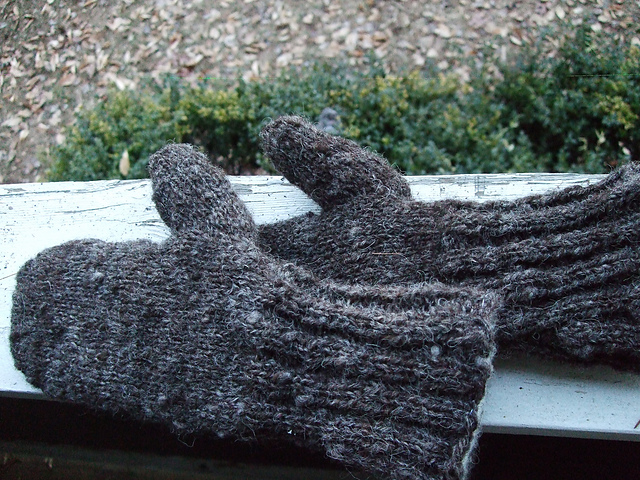
We’d been having a particularly cold winter this year with a ton of snow–over a foot one day in February alone. Having lived my entire life in Virginia Beach and points south, I wasn’t really prepared for that amount of snow or how to deal with it. I didn’t have a pair of mittens that was insulated enough for snow. I did have a ton of nigh waterproof handspun and some cashmere yarn scraps, so I figured I’d make some shoveling mittens (IN MARCH) and put them away until the next winter.
Y’all.
I BLOODY GOT TO USE THEM. We got another huge whack of snow in mid-March (MARCH), so they got a workout shoveling some snow. They worked as intended, so that was nice.
We won’t even talk about when it briefly snowed again in mid-April. We just won’t.
Anyway, the mittens are fully lined in soft recycled cashmere. The lining is a sort of ridiculous Frankenstein patchwork of scraps cause I had a ton I wanted to use up. They look sort of ridiculous if you pull the lining out:

They are super soft though, which is nice because the yarn is not. I didn’t use a pattern or anything for them, by the way, just sort of made things up as I went, as usual.
Fortunately, spring seems to have finally arrived in these parts. Though like I said, it snowed in April. Just after Joe and I were discussing freak weather. He said (at the time) that the snow was probably finally done and I say that it bloody well snowed in April, so I don’t believe that for a hot second, and then it turned out I was right. Unfortunately.
But it’s spring now, finally. I think.
Right. So. Back with the posting thing. Anyway, I made a sweater. Well, this sweater I made back in February, but I never showed it off here, so here we go:
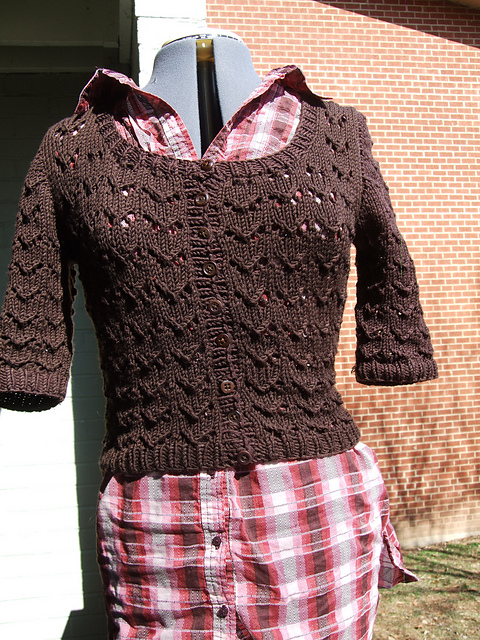
Pattern: Hetty
Yarn: Debbie Bliss Rialto Aran, seven balls
Needles: US 8/5 mm
Mods: Um, I’m sure I made some but I don’t remember?
This is actually the perfect sweater for this time of year–warm, but sometimes a little chilly in the evenings or when the breeze kicks up. So it’s sort of relevant for the several month delay in posting? In any case, I really love how it came out. It’s a wee bit short, but it’s a cropped sweater and I was limited in yardage anyway. It works well over dresses and that particularly long top it’s modeled on.
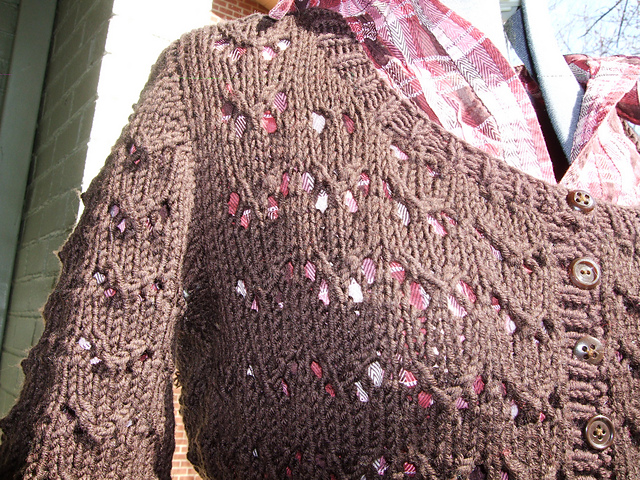
I think I had a dye lot issue, so one of the sleeves is a slightly different color than the rest of the sweater, but I don’t know that you’d necessarily see it as a casual observer of my clothing. It didn’t bother me to do anything about it anyway.
In other news: I went to Maryland Sheep and Wool! It was an excellent time and I spent way too much money, but I got to pet sheep and snuggle an angora bunny and buy part of a raw Romney fleece to process. Whee!
2014 is turning into a banner year for non-shark mittens. I’m sure that will change as the weather warms up, but for now, here’s another pair of mittens, named with a rather unoriginal pun. Whee!

Pattern: My own, made up as I went
Yarn: Corgi Hill Farm handspun, merino and silk
Needles: US 1/2.25mm Addi Sock Rockets
The patterning for these mittens was the result of wanting some sort of cable pattern to add interest and not wanting to do any purling whatsoever. Result: cables in the middle of some stockinette. It worked out exactly as intended. The cable is pretty simple too, which helped. I think it does a good job of showing off AnnaMarie’s super lovely handspun, which was sort of the goal.

I actually might do this same pattern again for me, which is something I don’t usually do. It’s only sort of a pattern–I mean, they’re mittens, and I do need some more mittens. They’re mostly plain mittens, with some cables for interest. So it’s not really like knitting a pattern over again. Plus also, I might actually write these up. The ones I make for myself will have a totally different gauge, but I think the pattern might be nice for something akin to Knitty’s Knitty Spin patterns–ie, intended specifically for hand spun. I might make mine in the brown yarn from the fleece. But with a lining, since that handspun is a bit rough. At a tight enough gauge, though, they’ll be practically water proof.

Anyway (which is a word I use ENTIRELY too often, I realize. I got shut down in the middle of a presentation in kindergarten for overuse of the word, which should give you some idea of how often I use it; anyway–), the mittens came out super pretty, and the pattern did exactly what it was supposed to do. Yay.
Mittens, generally speaking, are a pretty quick project, even in fingering weight yarn. Especially when you have super tiny hands, like apparently I do. The mittens I’m about to show you, however, are not a quick project. I mean, if you look at the dates on its Ravelry page, you might think, “Hey! They only took you like a week! That’s fast!” And if I only had the time to knit in the evening or was working on a bunch of different projects, you might be right. But there are several days in there where I spent ALL DAY (like, eight hours) working on these buggers. So in actual number of hours, they took FOREVER for mittens.

Don’t get me wrong, they’re completely adorable, and I love the finished object (though sadly, they’re not for me). But do you see those quills? Each of those quills has about nine stitches in it. Nine fiddly stitches. And they cover the back of the hand.
Pattern: Hedgehog Mitts
Yarn: Recycled wool/acrylic/alpaca
Needles: US 4/3.5mm
Mods: They’re mittens, so you know I mostly just did my own thing and threw in the stitch pattern

Like I said, I love how they came out, and I think they’re really cute. There are several patters out there for Hedgie mittens, and to be perfectly honest, I think I’d recommend you try a different one. This one was pretty hard to follow. For one thing, the directions are written in paragraphs instead of line by line, like most knitting paragraphs, so it’s hard to find your place. For another, there are no finished measurements, so there’s no way to tell how big the sizes are until you’re halfway through knitting them. I wasn’t about to swatch a quill pattern, so I cast on the adult small/child large (it’s the same size, which is another problem), and hoped for the best. I wasn’t sure how the quills would react (I thought they might pull in a bit), but they ended up being a bit large. I decreased a bit and knit a longer cuff to compensate, but that was a step I wouldn’t have had to take if there had been finished dimensions.
See, I think I’ve probably knit about 200 pairs of mittens, fingerless mitts, and gloves over my knitting career. (Most of them were sharks.) I’m pretty familiar with the measurements I need to make them fit given a particular size of hand. I’m also pretty familiar with my gauge in various yarn weights as related to hand size. So I have no idea what my stitch or row gauge is for a dk yarn on size four needles, but I know that I need to cast on 40 stitches and increase two stitches every three rounds until I get 15 stitches for the thumb in order to get mitts that fit my hands. I can compensate for different sizes in a pattern based on my gauge and the given dimensions. I only cast on 40 stitches for my Northanger Abbey mittens because that’s how many I need for dk yarn and size four needles, even though the pattern said to cast on like 56 or something ridiculous (and the finished dimensions listed in the pattern supported my idea that they would come out WAY too big; I usually cast on 36 for mittens in the yarn and needle size called for in pattern). I’ve gotten very good at modifying mitten patterns to fit my little hands.
All that to say: I really need finished dimensions on patterns so I can modify. I’m not about to swatch to get the gauge you think I should; I much prefer to use my gauge modify on the fly. It’s a system that has served me well for many, many knitting projects. But I guess if you take the time to swatch and like math, you could probably figure out the estimated finished dimensions of a pattern based on cast on numbers and gauge. I don’t do math though, so that’s not for me.
Anyway, have some more pictures:


